
Baby Back Rib Class
On July 4th, 2010 "Car Wash Mike" McKernan passed away. Mike was a true BBQ ambassador, proud to be an Egghead, and was one of the most distinguished members of the Big Green Egg Forum. He will be missed but never forgotten. I will remember him as being quick to help out the younger cooks and the old hands alike, always handing out good advice, and he never tired of answering the same questions over and over. There is no doubt that Mike is responsible for teaching thousands of folks to barbecue ribs. Since posting Mike's rib method in the summer of 2007, this has been one of my most popular pages.
~~~~~~~~~~~~~~~~~~~~~~~~~~~~~~~~~~~~~~~~~~~~~~~~~~~~~~~~~~~~~~~~~~~~~~~~~~~~~~~~~~~~~
When it comes to pork ribs, many cooks prefer baby back ribs. These do not come from a baby pig, they are simply smaller because they are cut from the part of the rib closest to the backbone. Sometimes known as loin back ribs, they have a distinctive curve of the bone compared to spareribs, which are cut from the belly of a pig. Car Wash Mike, a regular contributor on The Big Green Egg Forum has mastered a technique for cooking these ribs and agreed to share it with me. So here is how Guest Pit Boss, Car Wash Mike, prepares his ribs.
I don’t claim to be a rib eggspert but I will give you some basics today to get you started in the right direction. First, I cook baby backs exclusively. A 3 pack at Sam’s club works well.
THE PREP!
After opening up the package. Pat the ribs down with paper towels. Take the membrane off the bone side. To do this take a paper towel on the small end and pull towards the large end. Today I used Dizzy Pig Original for the rub. Leave the ribs meat side down. Now, I actually rub, the rub in, on the bone in side. Flip over, lightly coat with mustard. The mustard will not give any flavor. It gives you three different values in my opinion. Others will argue. The vinegar in the mustard will start breaking down the collagen in the ribs. It will give a better bark. It will also help the last coating of the rub to stick to the ribs. After applying the mustard. Coat with Dizzy Pig Original Rub. After prepping put back in the fridge for at least 1 hour, but no more than 2. If you haven’t lite you egg. Now is the time.
THE COOK!
Okay, the process just got a little complicated. I have cooked over a 100 slabs of baby backs, EVERY YEAR for over 15 years. I tell you this, so you don’t get discouraged if your first few attempts are not desired. Practice makes perfect. Put your wood of choice on the clean burning fire of the egg. Add 3-4 wood chunks. Try to stick with fruit woods. I used apple and cherry wood. They are going to start smoking right away. Put you plate setter on the fire ring, legs up. A large drip pan on the plate setter. You need to let the wood smoke for at least 30 minutes before putting the ribs on. I always use an inverted V-Rack. I think the heat off the plate setter and drip pan, cause a tough skin on the bone in side. Get your egg stabilized at 200-225. The first few hours are the most important. Your ribs need to be cold when placing on the egg. They tend to soak up the smoke better and have a better smoke ring. I like to mist the ribs. I like to use a 50/50 mixture of apple juice/apple cider vinegar after the first hour. I do this every hour until done. After 3 hours bump that temp up to 250. Opening up the egg for misting may accomplish this.
Okay, we have had our ribs on for 3 hours. Time to get that temp up to 250. Mist one more time after an hour. Let go another 30 minutes. The ribs have been on 4 ½ hours. Pick a slab up. If it folds in half easily, it is time to finish. If not, put back on for another 30 minutes. Also, another way to check is that the meat should have pulled back approximately 1 ½ inches. Another way is to, go ahead and pull a slab off and cut. If the bone is white in color they are ready.
This is where experience comes in. The texture you want will determine when to pull off. If you want fall off the bone. Let them go 5 ½ hours. Remember though. You might be taking a chance on them drying out.
THE FINISH!
There are all kinds of good bbq sauces out there. I think the secret to great sticky finger ribs is a good sauce. I always use a sugar based sauce. I make sure my bbq sauce is cold (been in the fridge) for a few hours or days. This makes the sugar thicken up. This will produce a full flavor of sauce on the ribs.
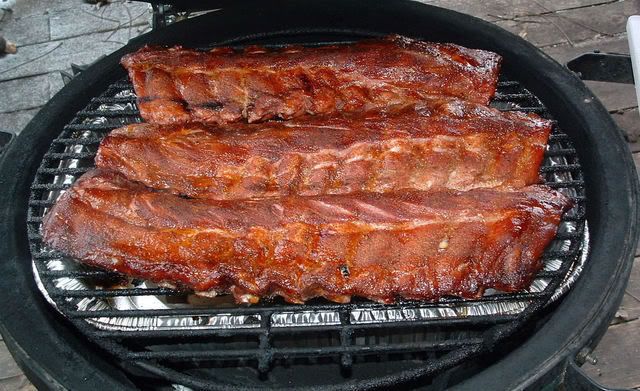
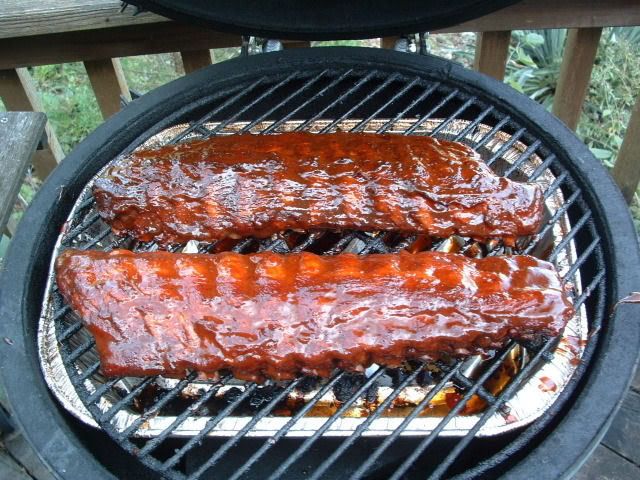
Our ribs have been on between 4 ½ and 5 ½ hours. After pulling them, set them aside and get the egg up to 275. While the temp is climbing apply the desired amount of bbq sauce on the ribs evenly. Today we used Blues Hog. Many competitors use this. Pull the V-Rack off. You want your ribs laying flat when finishing. Place the ribs back on the egg bone side down. Leave on for 20-30 minutes. If your guests allow, pull off, let rest for 5-10 minutes, slice up and enjoy.
![]()