
Introduction to Barbecuing
The nature of this page allows for plenty of additions because I never stop learning or asking questions, but the object is to keep it simple.
A lot of people don’t understand the difference between grilling, barbecuing and smoking.... and the terms are sometimes used a bit out of context. It's really quite simple .... Grilling seals in the juices from the meat you are cooking in just a matter of minutes because you use a high direct heat. This same direct heat cooks the product in a short amount of time. Items suited for grilling are steaks, hamburgers, chops and boneless chicken pieces. Barbecuing is a long, slow, low-heat method that uses charcoal or wood coals to cook the meat. When smoke is used for flavor you are actually cooking with smoke or "smoke-cooking". A barbecue pit design can be indirect by utilizing a heat barrier between the coals and the product or by the use of a firebox separated or "offset" from the cooking chamber. The set-up can also be direct, like in an open pit or vertical drum cooker, the key here being two or three feet of distance from the coals to the food. Barbecuing is ideally suited for large pieces of meat with a high fat content like whole pigs, shoulders, briskets or ribs. Smaller items like, pork steaks, chicken pieces or sausages can also be barbecued. Smoking on the other hand means smoking meats with smoke. Depending on the method (cold-smoking or hot-smoking) smoked products may or may not require additional cooking following smoking. Smoked products generally require some sort of a cure to enhance flavor, color and texture and also because smoking takes hours, sometimes even days or weeks. Bacon, hams, certain varieties of sausages, salmon and cheeses are examples of products that are smoked.
Barbecuing is not an absolute science. It is an art form that takes patience and practice. There are many different styles, flavors and techniques to explore. This page is a collection of basic back porch tips along with some things you might want to do, and some things you most likely don't want to do. This information should help the beginner make barbecuing a little easier. Through trial and error you will discover your own likes and dislikes. Although cooking with hardwood coals is the most traditional form of barbecue, it probably is a little complex for a beginner so here we will concentrate on cooking with charcoal.
PLANNING
First off, you need to allow plenty of time for barbecuing. Don’t get in a hurry. You will find that many times, preparation the day before will be worth the extra effort. Barbecuing means a long, slow cook. You will be cooking at temperatures from 225° to 275°, A rack of ribs will take 4 to 6 hours. A pork butt or brisket may take three times that long. Start the fire early. Cook more than you plan on eating, so you have a little to give to friends and neighbors or just for some leftovers. If you are doing a long cook, put on some wings or sausages for snacking.
PRACTICE
Great barbecue is a journey, not a destination. Barbecue may look easy when someone else cooks it. The recipes generally don't have a lot of ingredients. The cuts of meat are very common. Don't be fooled, there are a lot of hidden variables. There is a BIG difference between good barbecue and great barbecue. You will be very lucky if you make good barbecue on the first couple of cooks. It may take years before you make great barbecue. So before you serve barbecue to a house full of guests or the preachers wife...practice, practice, practice.
A good barbecue cook is knowledgeable and flexible enough to cook most meat, and cook them to please themselves as well as family and friends. This might sound strange, but work on tenderness and moistness first... then get your flavor profile dialed in.
COOKING LOG
Do get in the habit of recording the details of your cooks. Keep track of the type of product, seasonings, preparation, cooking temperatures and times, basting, type of sauce etc. Accept any comments and criticism with an open mind. If you need to make changes, don’t adjust too many things at once. Change one or two things at a time.
THE COOKER
Many pit masters agree that “it’s the cook, not the cooker” but you must figure out your cooker and its capabilities. Learn how to set the vents for different types of cooks. Practice temperature control. Learn how to set up for direct and indirect cooking. If your cooker can also function as high temperature grill, you have the best of both worlds.
THE FIRE
Use a good quality hardwood charcoal. If you are using a kettle, bullet or a horizontal cooker, you can experiment with briquettes and lump charcoal. Ceramic cookers work best with lump charcoal. You must use enough charcoal to have a burn time longer than your estimated cooking time. It takes around an hour for a fire to become established. Light the charcoal using a propane weed burner, a plumbers torch, a chimney, an electric coil, or starter cubes but DON’T use lighter fluid.
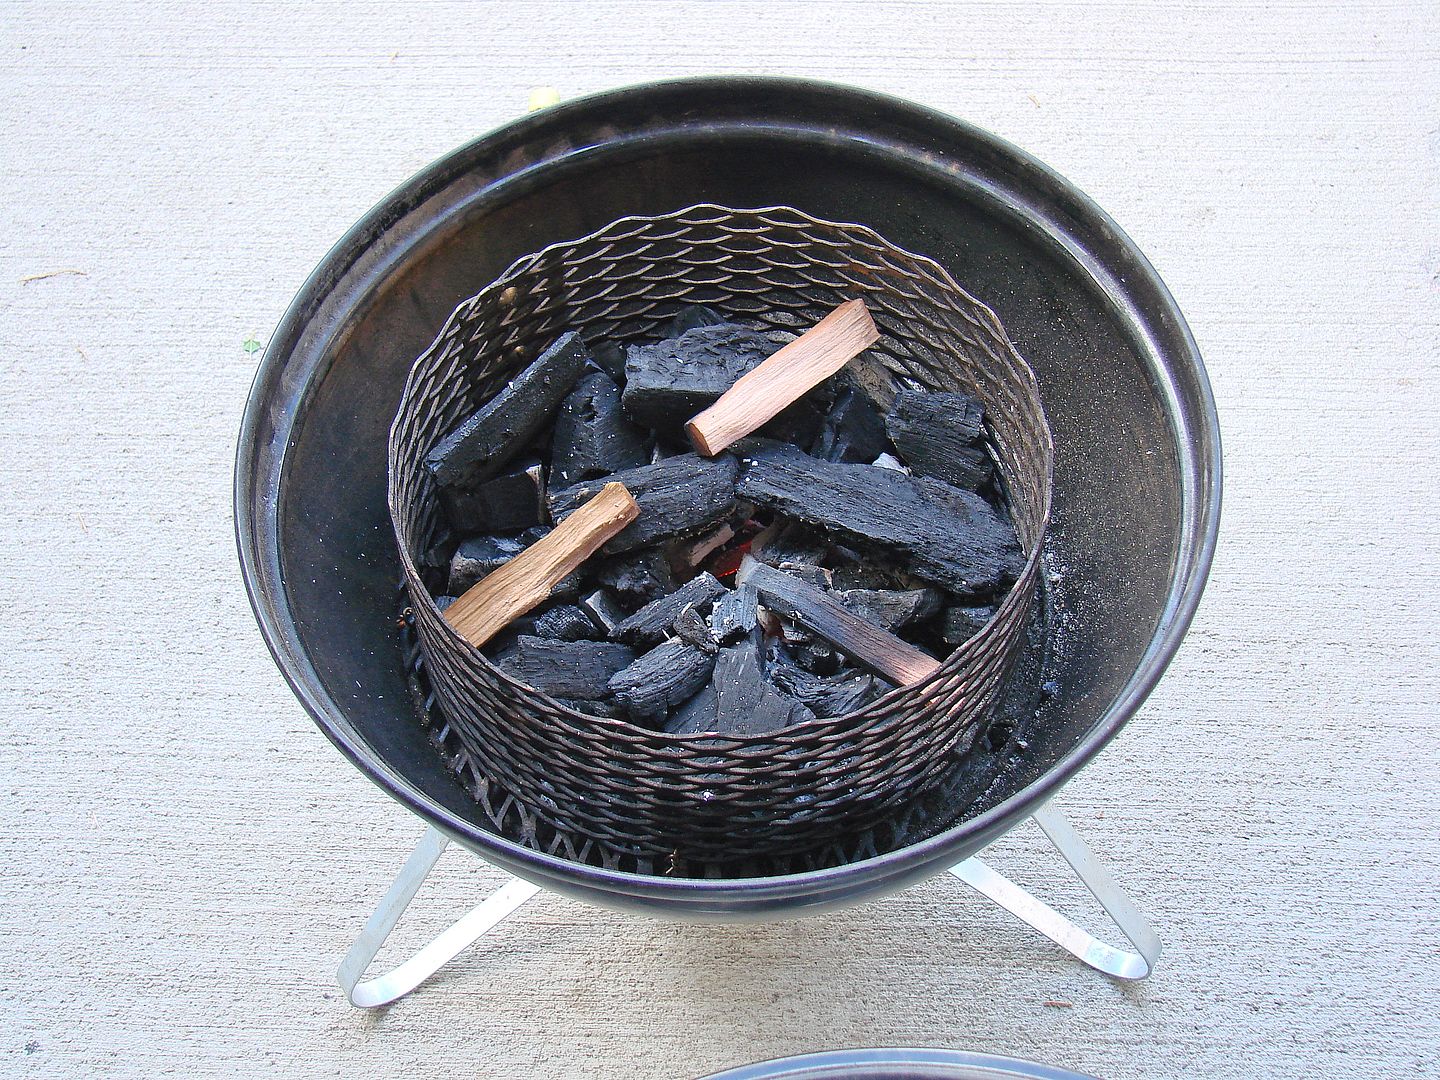
The charcoal in my Big Drum Smoker, or my Smokey Joe Custom Tall Boy is contained in a charcoal basket. I use a small torch with the Smokey Joe, and a weed burner to light the BDS. It's easy to add more charcoal to the Smokey Joe, and the BDS has a large enough basket to have a 10 to 12 hour burn time. With either of these cookers flavor wood can be mixed within the lump before lighting, and/or added during the cook.
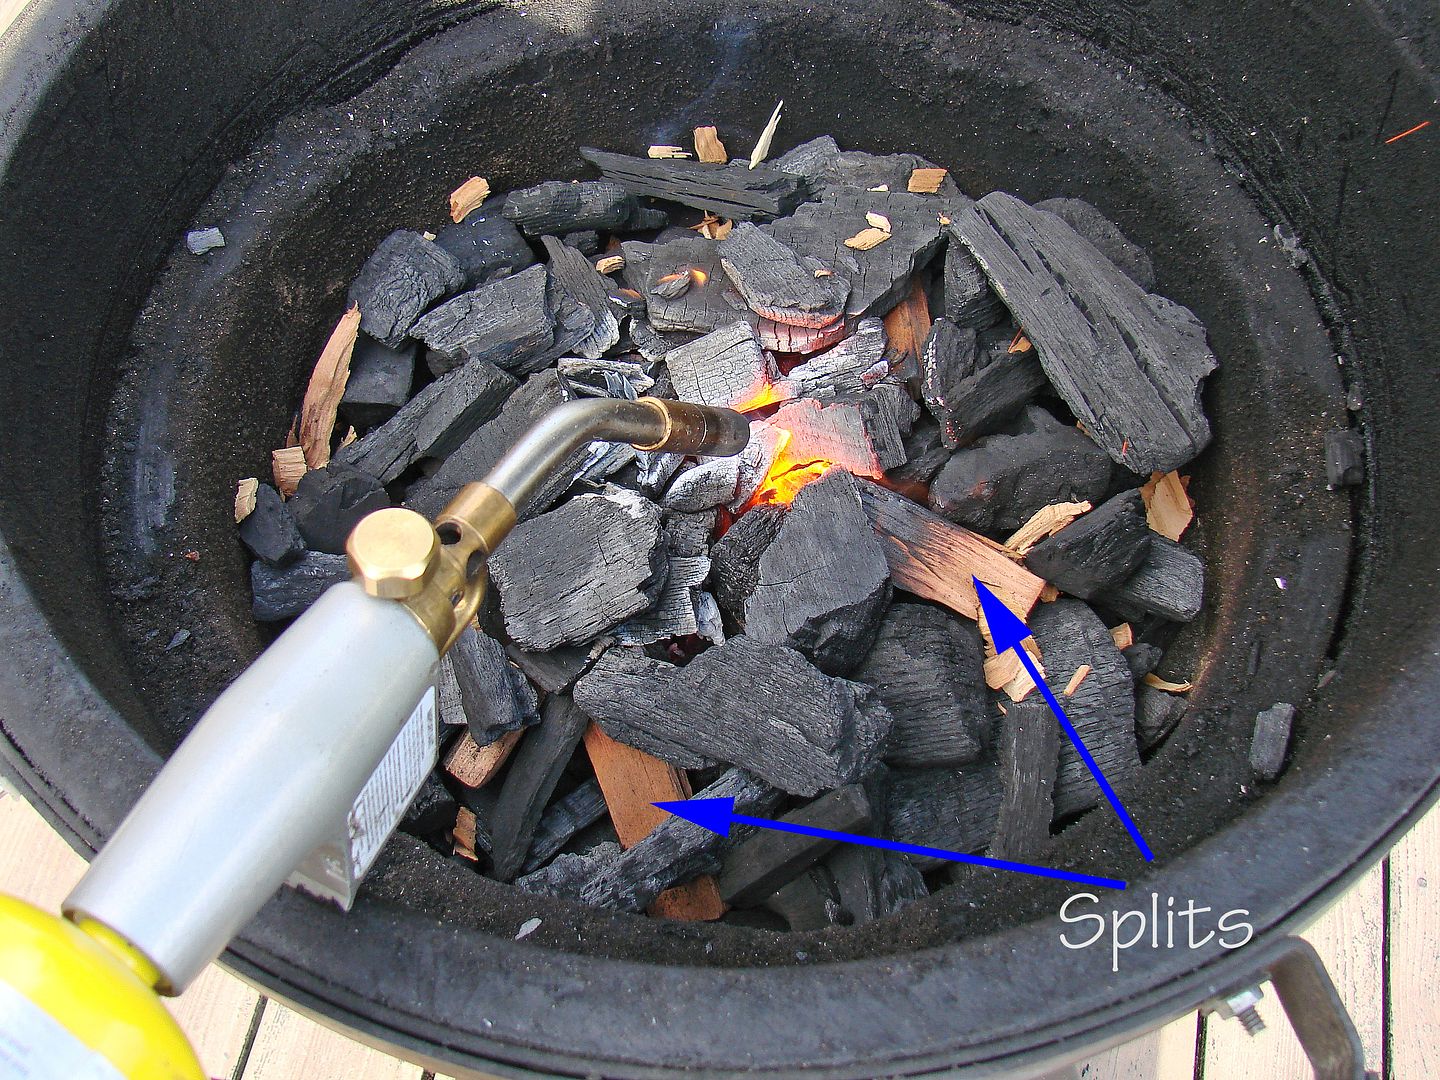
Here is how I build a fire in my Big Green Egg. The process is more detailed because it's harder to add charcoal and wood to an Egg during a cook. I will use a handful or two of flavor wood chips, and 4 to 10 "splits", which are 3/4" X 3" pieces of flavor wood that I have split down from a fist sized chunk.
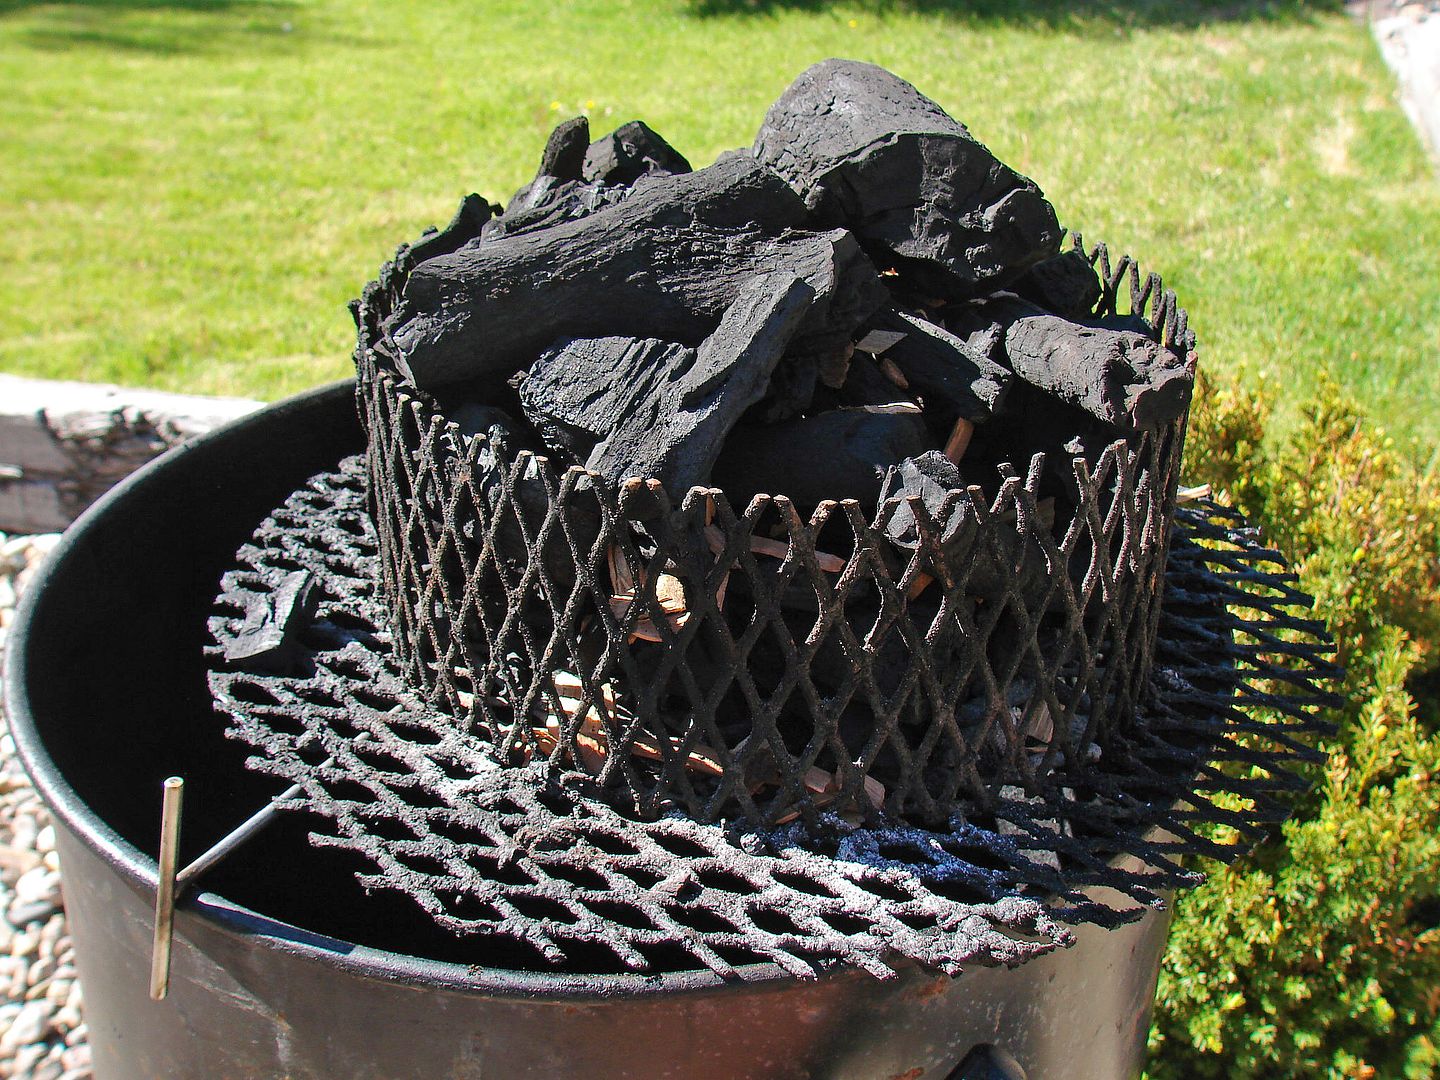
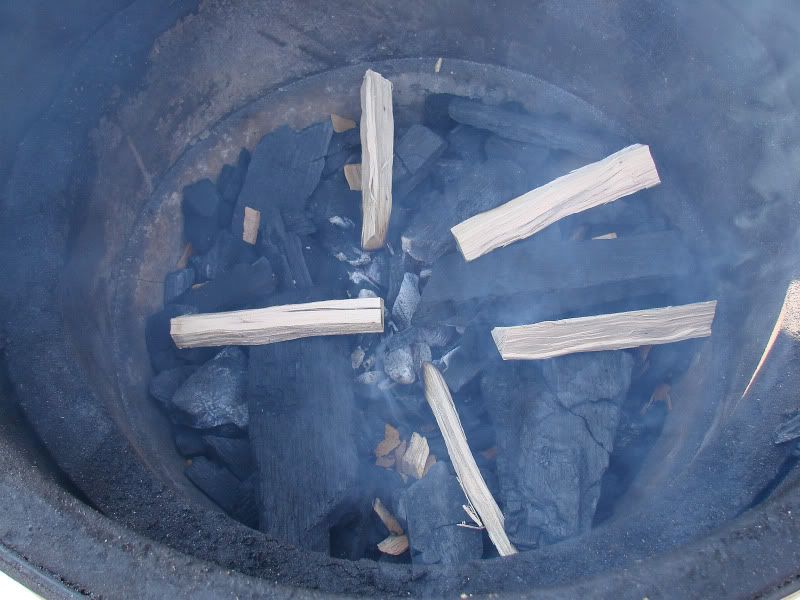
Step 1. Add a few large pieces of lump to the firebox. Large pieces are less likely to choke off the air flow. Sprinkle a few chips into the lump, add a little more lump, then add a few of the splits. I prefer a wagon wheel arrangement with the splits. Notice only the firebox is full, and I lit the lump in one central spot. This would be a good fire for ribs or sausage. And if I wanted a higher temp "grilling fire" I would light the lump in 3 spots.
Step 2. For a longer burning "barbecue fire" add another layer of lump, a few more chips, a couple of splits. Repeat this process until you have adequate lump for the length of burn you are doing. Then light the lump in one central spot. Here is a barbecue fire, this will be a long burning fire for ribs, butts or brisket. There is no need to add more charcoal or more flavor wood to this fire as it should cook for 16 or 18 hours in the 250° range.
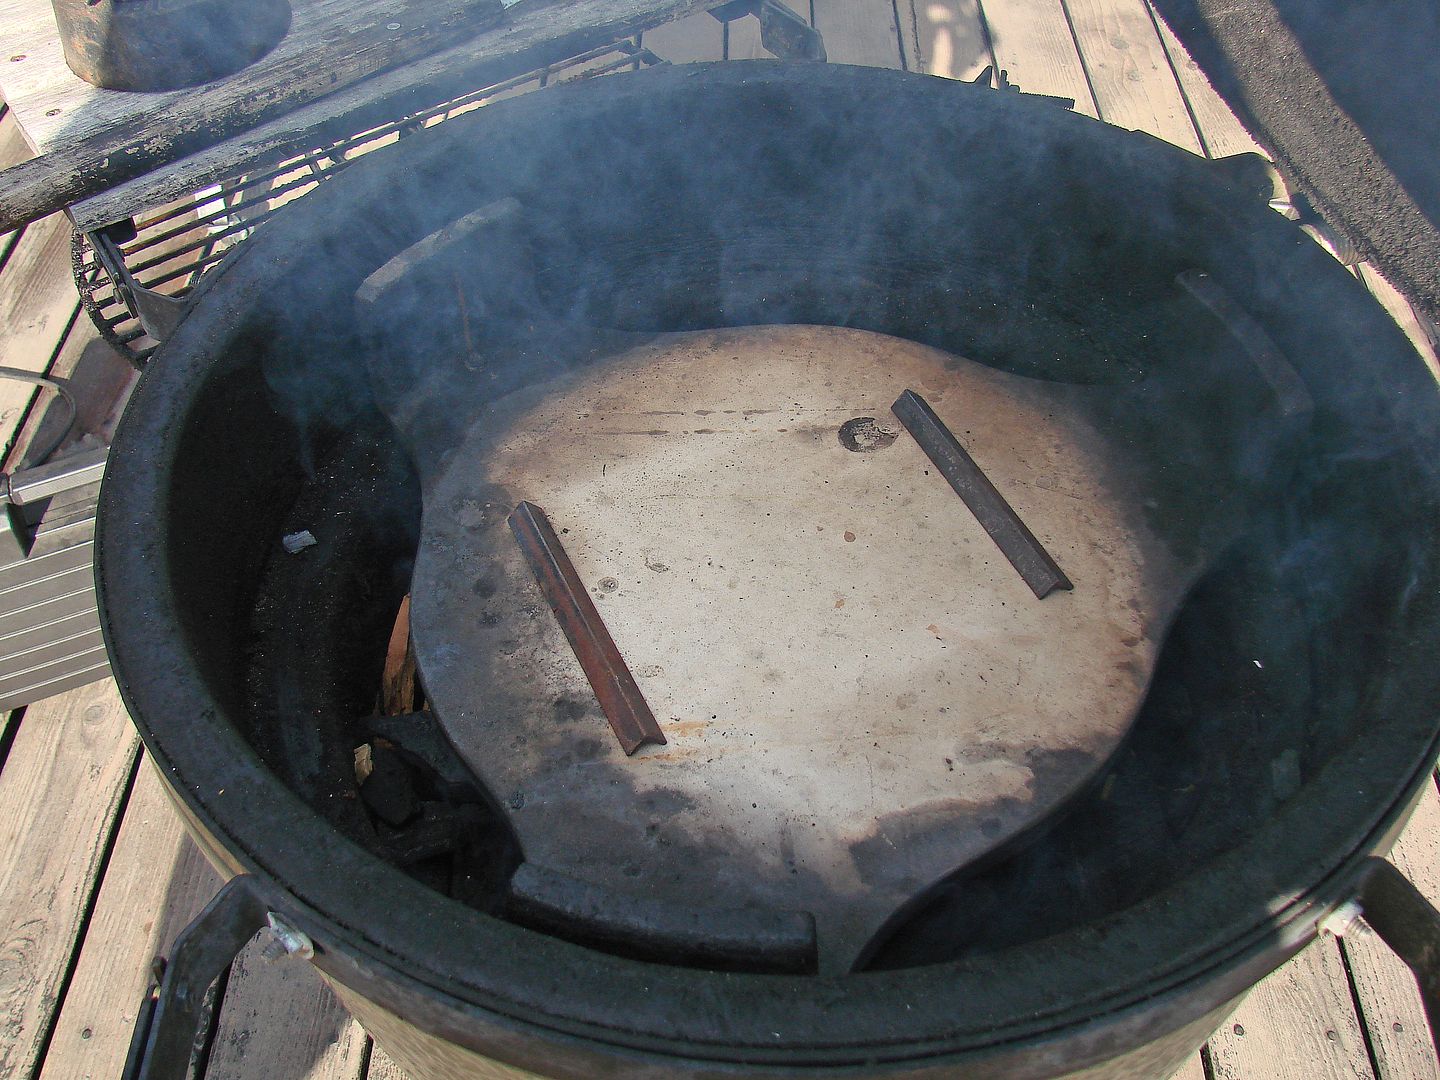
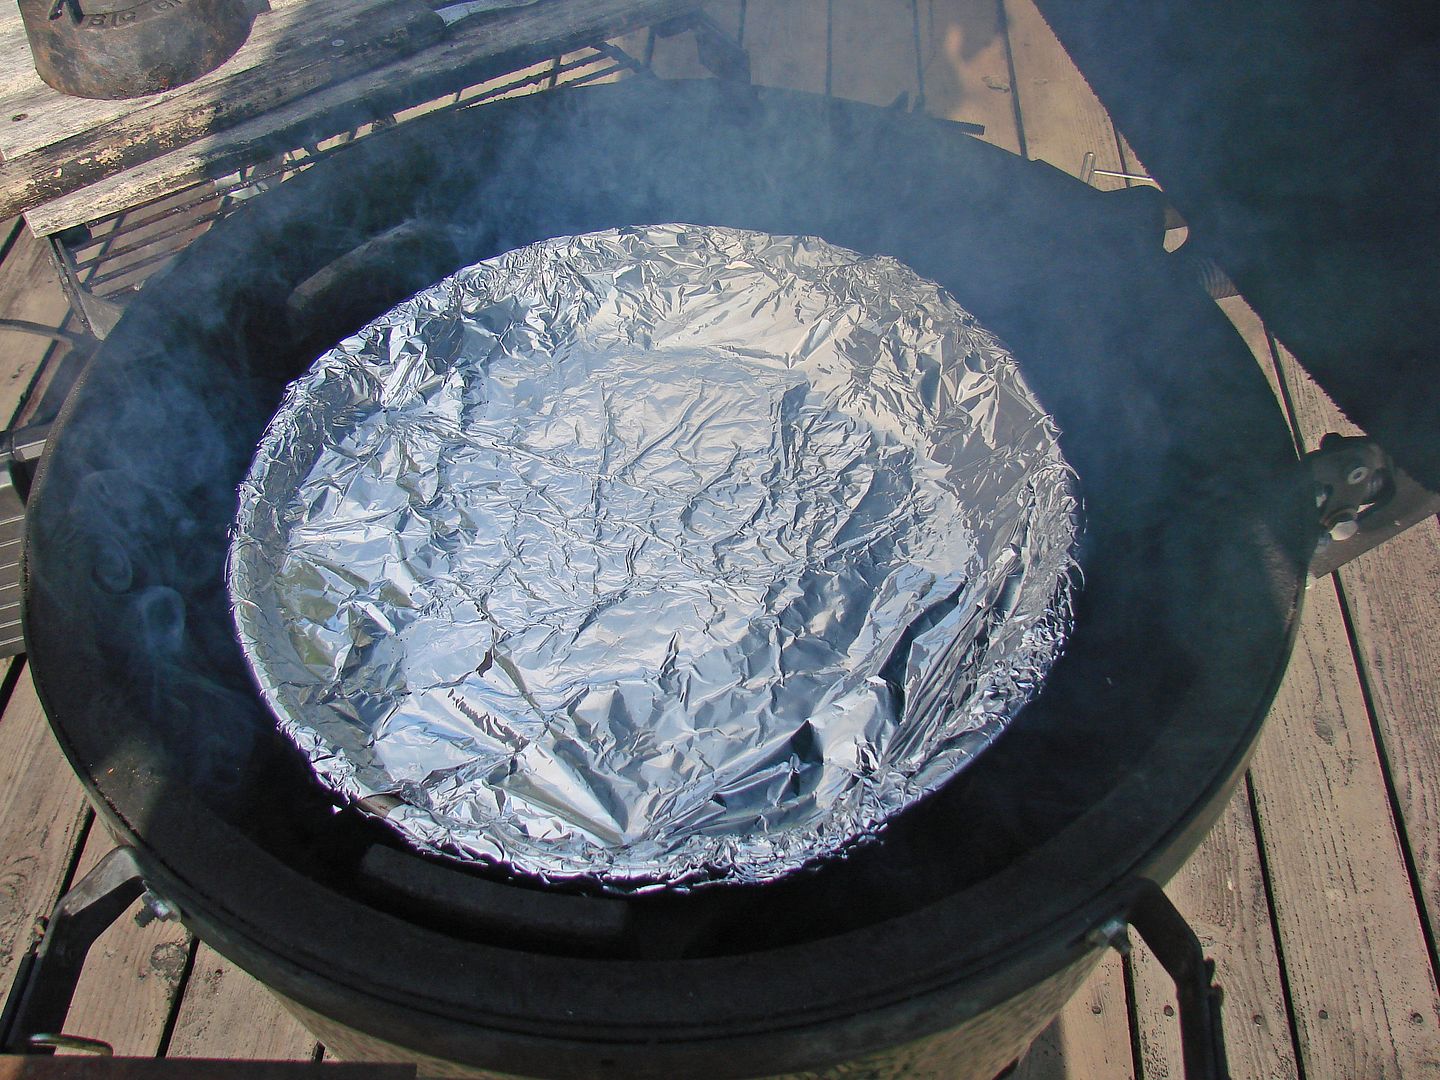
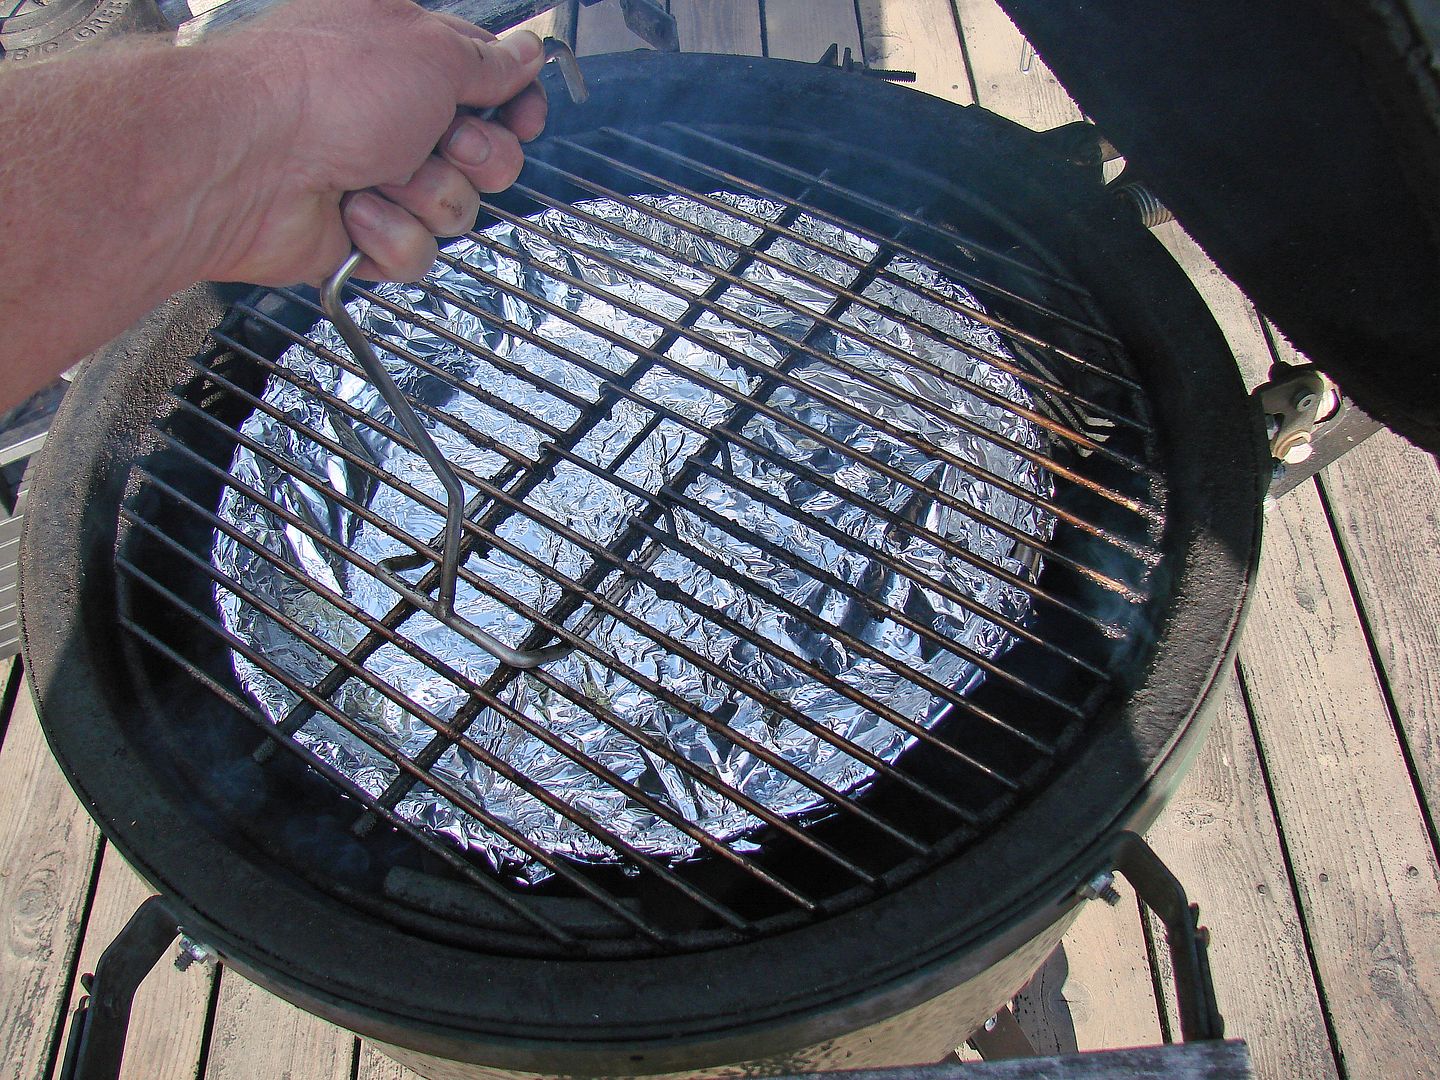
Step 3. Once the fire is lit, I add a plate setter. I use a couple of inverted pieces of 1/2" angle iron to allow an air gap for my drip pan. The empty drip pan goes on the plate setter, followed by the cooking grate. I don't use any liquid in my drip pan. If you want to add liquid to the drip pan, heat it up first. There is no reason to waste energy from your charcoal for heating liquid. Now all you need to do is wait for the bad smoke to burn off, and you can start cookin'. (see the next section on SMOKE)
THE SMOKE
Guess what, you don’t always have to use smoke when you barbecue!!! However, it’s no secret that most folks do like a smokey flavor on their barbecue. Everyone has a different smoke threshold so you must be careful that you don’t over-smoke your product. If you’re using lump charcoal, it gives off a little smokey flavor on its own. Make sure to let the smoke from wood chunks or chips settle down before loading your cooker. Keep a watchful eye on your top vent or stack. A white smoke plume, billowing from your vent will most likely impart a bitter flavor and maybe a residue on your product. A light gray or blue smoke whiff is what you are after. This is one of the hardest things for a beginner to grasp so here are two pictures that “thillin” took of his Klose smoker with an offset firebox. In this type of cooker, the smoke moves from the firebox, across the cooking chamber and out the stack.
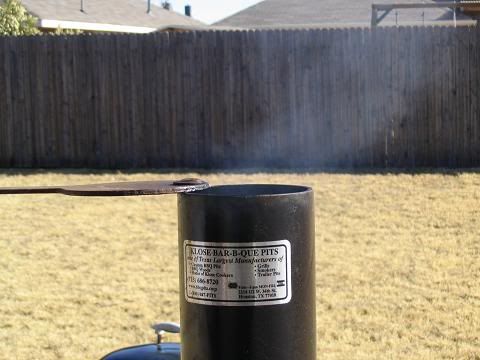
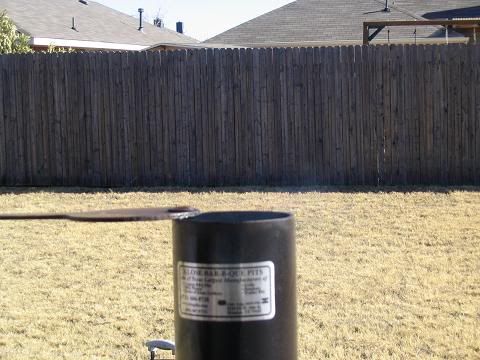
These pictures were taken just minutes apart and show the smoke in the final stages of settling down for a good long cook.
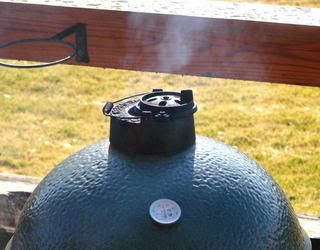
The next two pictures are of my Large Big Green Egg. On this cooker, the firebox is directly below the grate. Again the top picture is blowin' too much white smoke. The fire has not settled down yet.
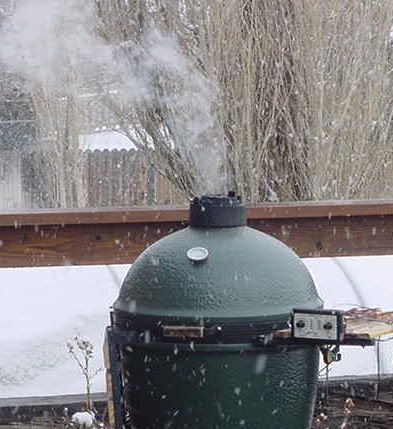
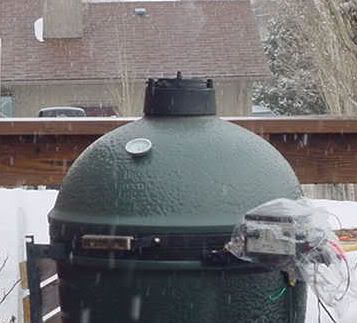
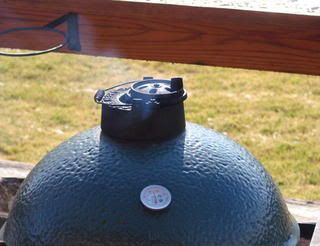
About 30 minutes later, the smoke is just right. You can see just a whiff against the background of my neighbors roof.
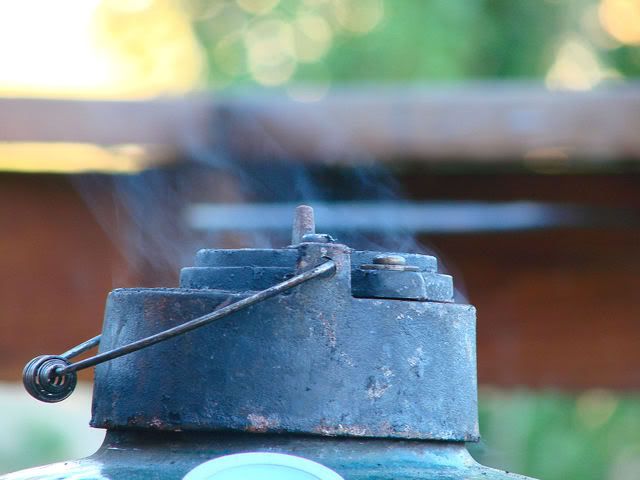
Here is a picture taken by "Scotty's Inferno" showing a nice mellow smoke coming from his Big Green Egg. I think Scott described this sweet blue smoke perfectly saying "you almost wonder if it's even there".
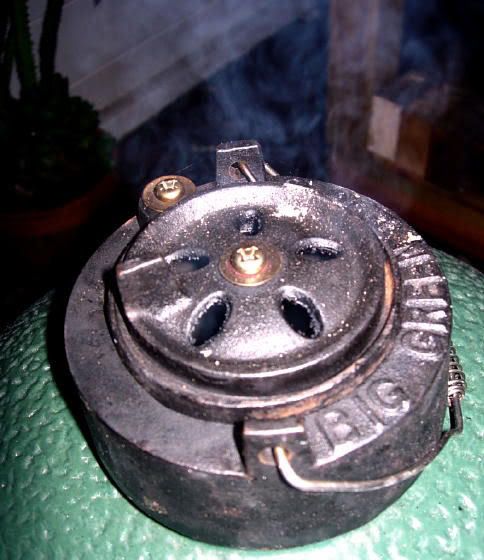
You can tell by the number of pictures of top vents just how I feel about getting the smoke right. Here are two more in daylight. The dome temperature is 350°. In the top picture the smoke is trying to settle down, but it is not ready yet.
This picture was taken 15 minutes later. Now the smoke is ready to meet the meat.
Here is one more that really shows off the "sweet blue" color of good smoke.
Start experimenting with fruit woods like apple and cherry before using heavier woods like oak or hickory. Experiment with using your chips or chunks dry verses soaking them in water. Also try mixing small chunks or chips throughout the charcoal instead of using one or two large chunks. For a flavor twist, toss an onion into the coals.
An exception to this rule would be tossing a handful of chips into the red-hot coals just before grilling a steak or some burgers. When grilling, the vents are open more and the smoke will pass through your cooker faster.
SEASONINGS The goal is to compliment the flavor of the meat, without overpowering it. For starters, try out a few good quality commercial rubs or a mixture of your favorite seasonings sprinkled or rubbed into your product. Experiment to find the flavor combinations that you like.
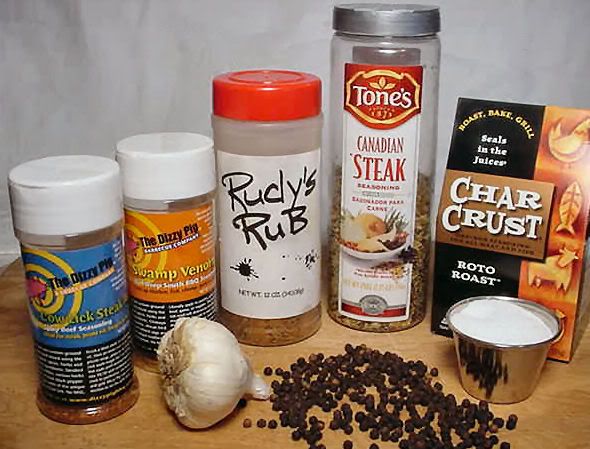
There are many starter rub recipes on internet recipe sites, internet Q- forums or in the many barbecue cookbooks. Explore marinades, basting liquids and injections too. DON’T apply sauces too early during the cook, wait until the end or serve them at the table.
THE COOK
Start out with easy cooks. Use a thermometer to monitor the temperature at the grate as well as your product. Remote "polder type" cable thermometers work well because the probe can be clipped to the grate and you do not have to open the lid to monitor the temperature. An inexpensive oven thermometer sitting on the grate works too. When taking internal temperature readings on meat, make sure the thermometer is not close to bone or stuck into a pocket of fat, both of these locations will give you false readings. Bone is a good conductor of heat and will give you a false high reading. Pockets of fat don't conduct heat as well as the surrounding muscle (meat) so they will show a false low reading early in the cook.... later on, the fat temp and meat temp equalize.
Chicken, sausage links & logs, or country-style ribs (cut from a pork shoulder) are good starters. Whenever possible, cook meat on the bone. Spare ribs take a little more time and effort. A pork butt is a good choice for your first long “low and slow” cook. Turn or rotate your product the minimum number of times for even doneness, even color or if you have a hot spot in your cooker. Keep a close eye on your first few “all night” cooks. Too often the fire dies out in the early stages of the cook and goes unnoticed, resulting in food safety issues. Until you learn your cooker and how meat cooks, don't be too concerned with using "low and slow" pit temps around 200°. They can be hard to hold. Considering an average butt or brisket, a pit temp between 230° and 250° is usually adequate to insure an internal temperature of 140° or higher in the first 4 or 5 hours of your cook. Some cookers are more reliable than others but another good rule is to check your pit temp every 3or 4 hours, especially on overnight cooks.
Finding the right balance of pit temperature and time will make all of your grilled or barbecued meast tender and moist. Some meats have a higher fat content than others. A chicken breast for example is much leaner than a chicken thigh. Pork loin and tenderloin is much leaner than meat from the shoulder or rib areas. Fat does add flavor and helps keep meat moist, and generally speaking higher fat cuts have a broader window for doness than leaner cuts of meat. Going back to the chicken example, breasts are done when their internal temperature is between 160 and 165 degrees, much higher and they will be dry and tough. Chicken thighs on the other hand should be cooked into the high 170's or low 180's and they will still be moist and tender.
Meat is made of strands proteins and when you add heat (energy) to a protein you are breaking down it's structure. This relaxes the strands of protein making it more flexable and tender. However, if you add too much heat or too much heat too fast, the protein won't relax the way you had planned, and the meat can be tough. A good example is a steak.... they are pretty tender to start with so they can be cooked at higher temps for a short period of time. As a steak moves from raw to rare to medium rare it gets more tender as the protiens relax. As it passes through the medium, then medium well, then into well done range, the strands of protiens are tightening up, and moisture is getting squeezed out of the meat, so it gets tougher the more it's cooked. The same thing can happen to pork chops or white meat on chickens or turkey.
One thing you will notice when barbecuing heavier meats high in fat like brisket and pork shoulder is a stall in internal temperature during the cook. This "plateau" will happen around 160° to 170° and sometimes takes several hours. Then the internal temperature will begin to rise again. The plateau happens because moisture in the meat finds it's way to the surface and begins to evaporate. Above 170° collagen begins to melt and convert to gelatin. When this happens, we get a tender and moist piece of meat that is worth the wait. Wrapping your meat in foil (see below) prevents sweating and evaporation, so this can help getting through the stall.
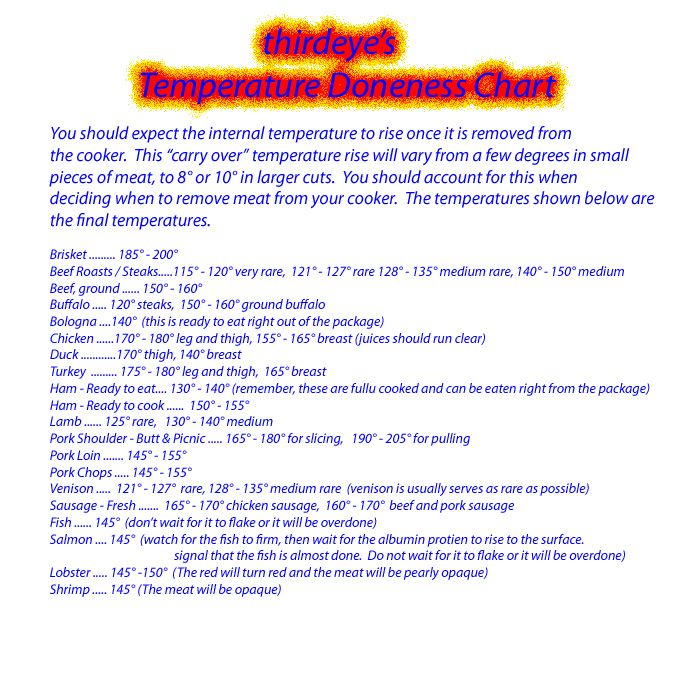
TEMPERATURE GUIDE - The temperature ranges below have worked for me when considering moistness and tenderness of the finished product. The USDA has a different range of temperatures they recommend for food safety. Click on this link to learn more: USDA
Finding your personal sweet spot for doneness (target doneness) is what's important. To do this correctly, you must figure out the internal temperature to pull a particular piece of meat or fish off your cooker. Then allow for the rise (or carryover) in temp when resting.
A 5° to 7° rise can be expected in many grilled things like chops, burgers or steaks. Sometimes you might see a 10° rise. There are some exceptions..... A grilled salmon fillet may rise more than one that was hot smoked at a lower pit temp. A prime rib roast cooked at 350° may rise more than one cooked at 225°. A big roast like a pork butt, pulled at 200° may rise more than 10° because it has so much mass and a high fat content.
I tend to bend the temperature rules more often on poultry white meat, ground beef, lamb, steaks and pork loin. But you should decide your personal preference for doneness. I would however, suggest the USDA recommended temperatures when serving guests. Just remember that rise during the rest period. That being said, here are some guidelines that I use at home:
RIGHT CLICK THE PICTURE TO PRINT MY CHART
Keeping an eye on the temperature won't so much good if your thermometer(s) are not calibrated. This goes for your pit thermometer and your kitchen thermometers that you use for monitoring the internal temperatures. There are some online boiling point calculators which take into account daily changes in barametric pressure as well as elevation, but here is a chart that will get you really close. (in other words, don't sweat a couple of degrees)
ELEVATION .....BOILING POINT
sea level ........ 212° F
600 ft ......... 211° F
1,100 ft ......... 210° F
1,600 ft ......... 209° F
2,100 ft ......... 208° F
2,600 ft ......... 207° F
3,100 ft ......... 206° F
3,600 ft ......... 205° F
4,100 ft ......... 204° F
4,700 ft ......... 203° F
5,300 ft ......... 202° F
6,000 ft ......... 201° F
6,500 ft ......... 200° F
7,000 ft ......... 199° F
7,500 ft ......... 198° F
8,000 ft ......... 197° F
8,500 ft ......... 196° F
9,000 ft ......... 195° F
FOIL
Sometimes called a crutch, foil does have a place in barbecuing. Using it when cooking meats is not mandatory so, just look at this way, foil is a tool not a rule. One of the downsides to foil is it will weaken the bark. (see The Rest below). A few times where it comes in handy are: 1. Your barbecued meats are coming out too smokey. 2. You need some control in the color of your finished product (the bark). 3. You need to speed up the cook in order to meet your sit down time. 4. You want to change the texture of your product. Wrapping ribs with some liquid in the foil for example will steam/braise them making them more tender. Some folks sauce and foil thighs (usually a foil covered pan) at the end of the cook too. Following the cook, wrapping and resting meats in foil, especially if you are holding them in a cooler or Cambro-type device works great. Lastly wrapping (see above) can help shorten the stall.
THE REST
Allow your meat to rest before slicing or pulling. The juices need time to re-distribute into the meat. A prewarmed cooler is a good place for resting or holding your product until serving. Wrap in foil and use some newspaper for extra insulation if you need to hold it for a couple of hours. If you are worried about the condition of the bark, and not interested in the juices that accumulate in a foil pouch, or if you are slicing to order but still want to keep the meat moist... a brown paper bag works good too. Put the meat on a metal tray (or a piece of foil) and slip into the bag.
SERVING
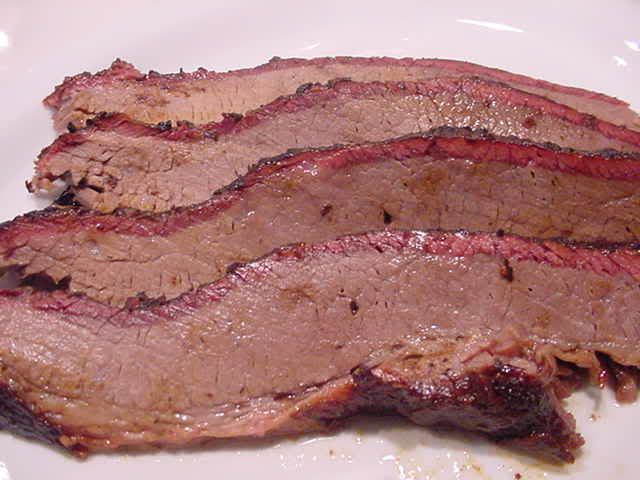
Ok, now you are ready to dig in. If you are slicing beef, pay attention to the grain and cut across it for tenderness. The slice of brisket on the left is cut with the grain, and the slice on the right is cut across the grain.
When pulling or chopping beef and pork, remove some of the fat but be sure and mix some of the crust or “bark” in with the meat. If you have finished or rested your meat in foil, save the juices and use them to enhance the meat or as an adder to your sauce.
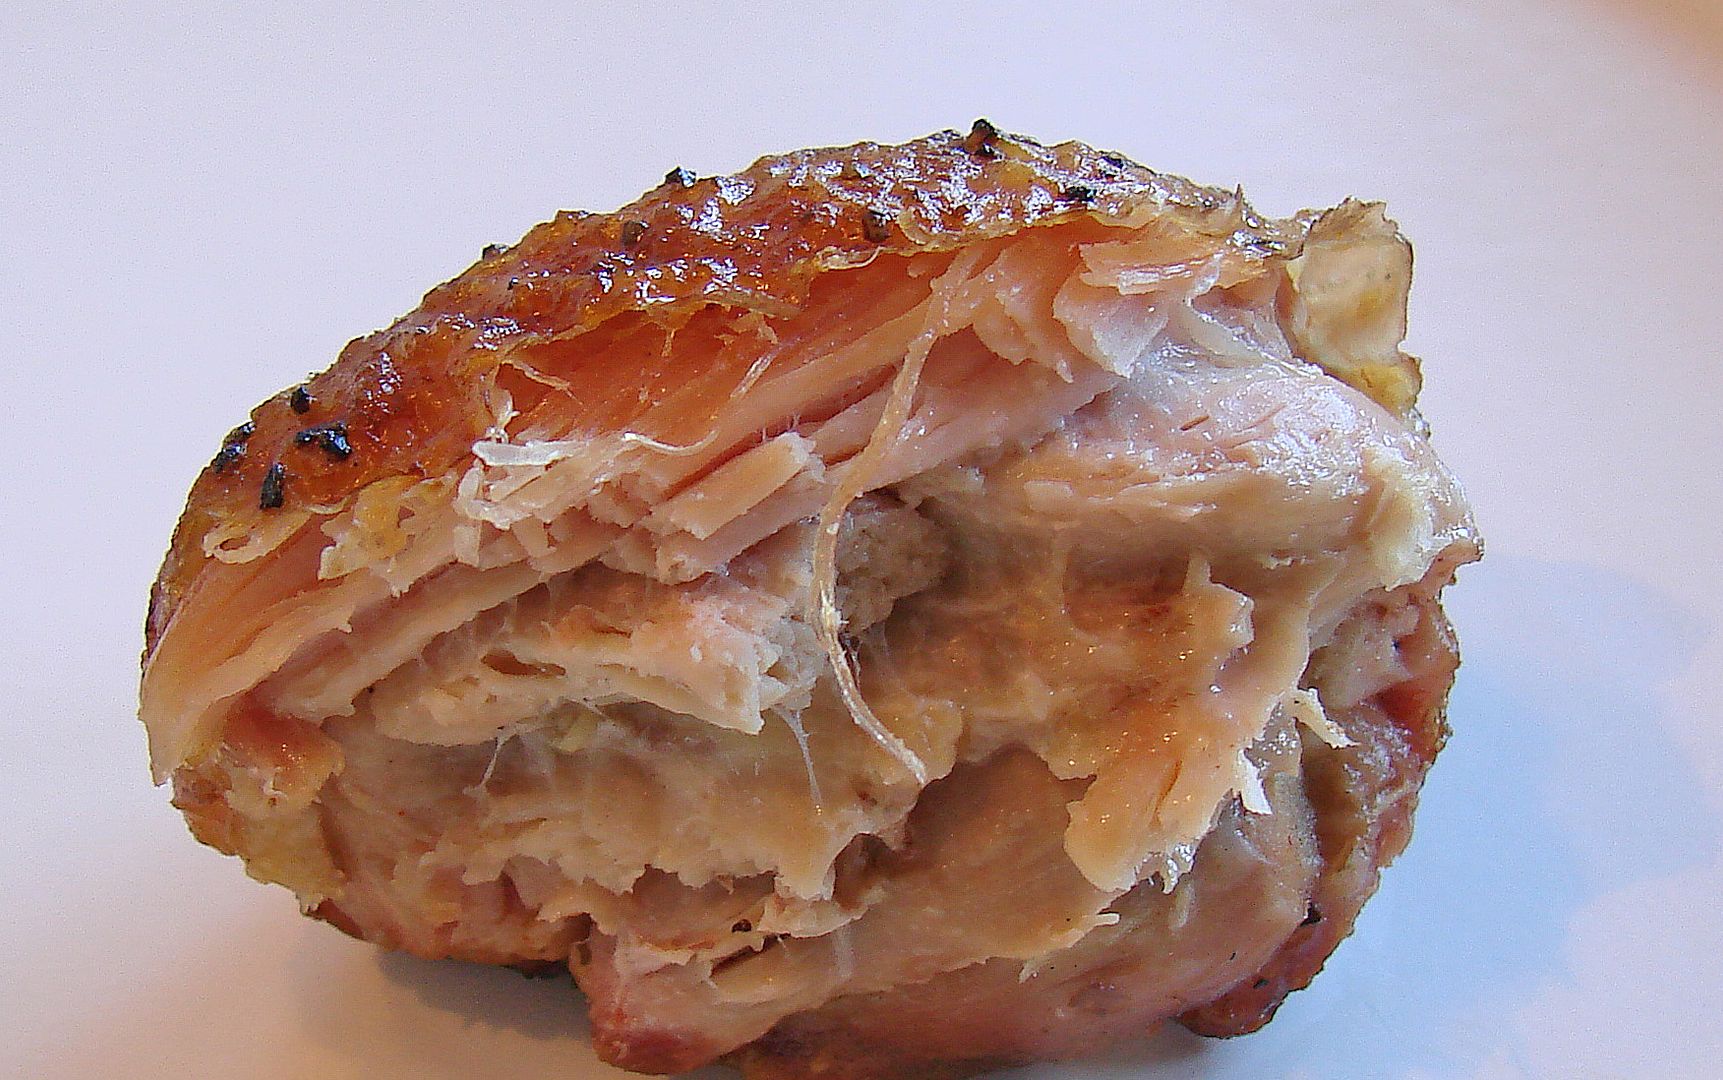
Don’t be alarmed if grilled and barbecued meats, especially chicken, has a pink color. This is a natural reaction from the smoke and does not mean that the meat is under cooked. If you monitored your finish temperature and any cutting board juices run clear, the meat is done. (Underdone chicken will not pull apart easily A simple trick is to blot a paper napkin onto the chicken or the juices, if it comes away pink, the chicken is underdone). This is a boneless thigh which was cooked to an internal temperature of 185°.
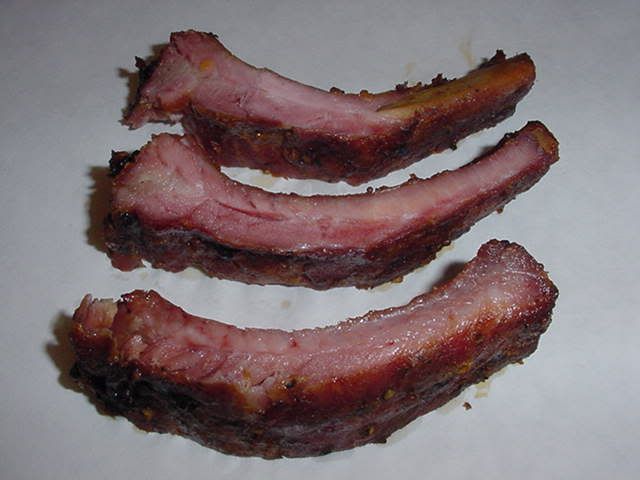
These baby backs were barbecued for almost 5 hours at 225° using a little cherry wood for smoke. Trust me....they are done.
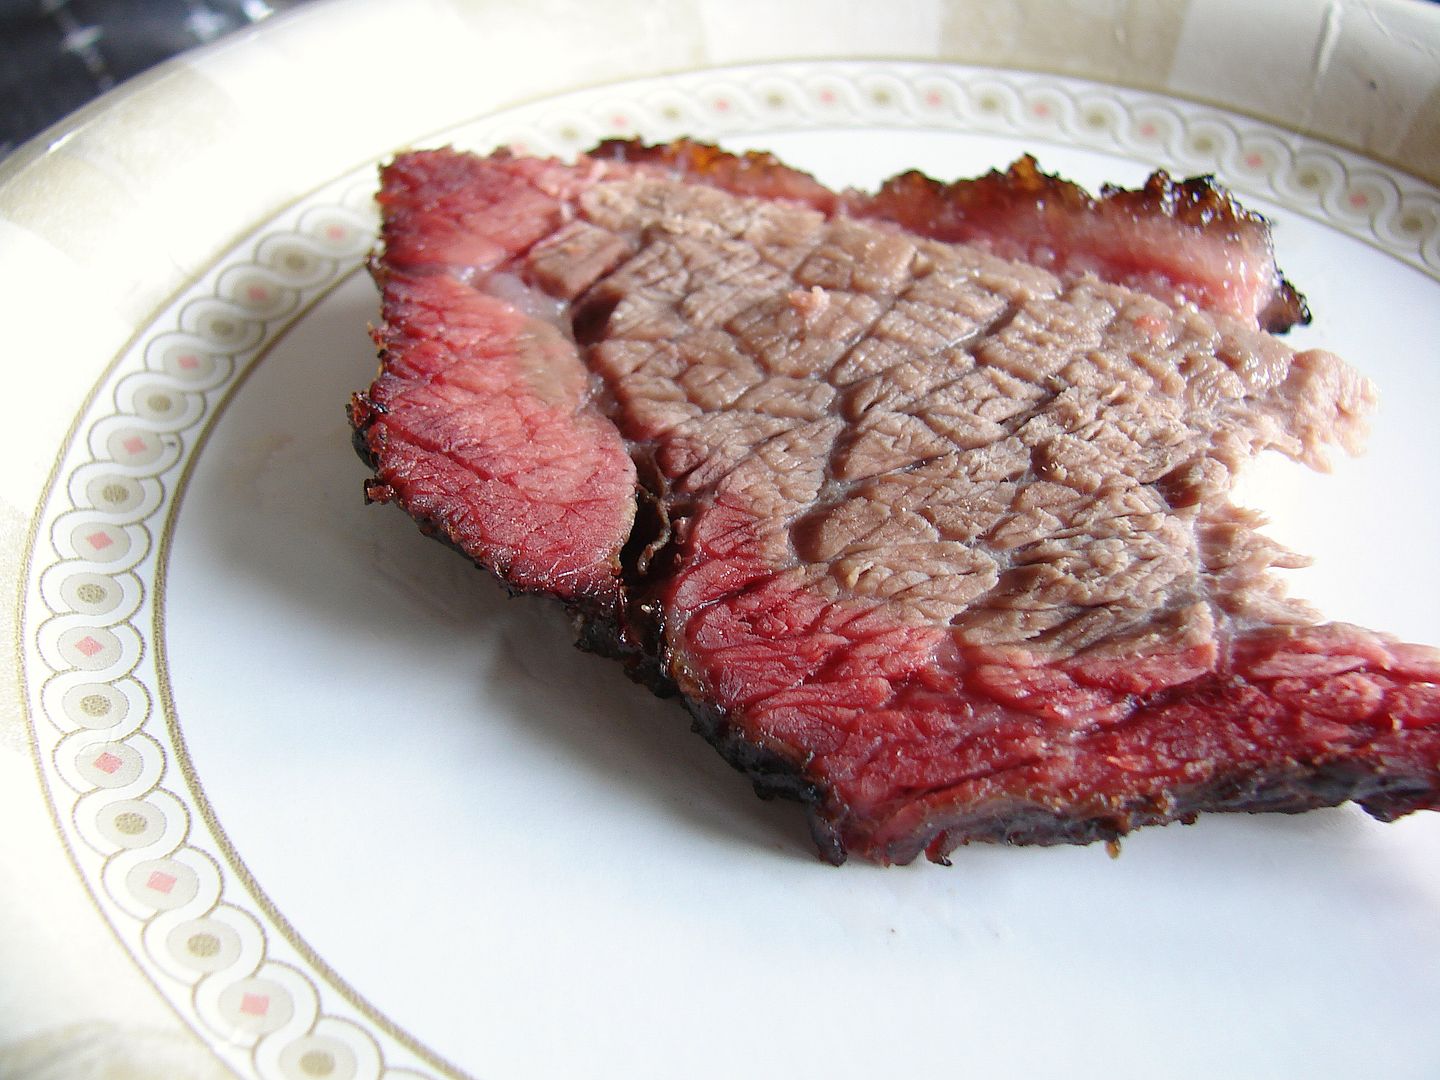
You will sometimes notice a red or pink ring around the edge of slices on larger cuts of meat like this brisket. This ring is highly desirable in barbecue competitions, but it adds no special flavor.
Don't be too eager to slather on the sauce, it is not always necessary. I like to serve a couple of kinds at the table.
REHEATING
For reheating barbecue use an aluminum pan. Add a diluted sauce, CocaCola, apple juice, broth or a mixture of any of these to keep the product moist, cover and place in a 250° oven for about an hour or until warm.
I have the results of a survey of favorite reheating liquids posted in the Rubs, Sauces, Mop section, check it out if you are looking for something new.
FOOD SAFETY
The nature of any outdoor cooking event, from grilling some burgers to smoking a brisket for 20 hours, sometimes allows us to let out guard down when it comes to food safety. And I don't just mean once we are in the backyard. I'm talking transporting and preparing raw meats, cooking, and serving.
HERE
is a link to the USDA site that discusses barbecue safety issues. It's worth a read.
COOKING LOG
Do get in the habit of recording the details of your cooks. Keep track of the type of product, seasonings, preparation, cooking temperatures and times, basting, type of sauce etc. Accept any comments and criticism with an open mind. If you need to make changes, don’t adjust too many things at once. Change one or two things at a time.
THE COOKER
Many pit masters agree that “it’s the cook, not the cooker” but you must figure out your cooker and its capabilities. Learn how to set the vents for different types of cooks. Practice temperature control. Learn how to set up for direct and indirect cooking. If your cooker can also function as high temperature grill, you have the best of both worlds.
THE FIRE
Use a good quality hardwood charcoal. If you are using a kettle, bullet or a horizontal cooker, you can experiment with briquettes and lump charcoal. Ceramic cookers work best with lump charcoal. You must use enough charcoal to have a burn time longer than your estimated cooking time. It takes around an hour for a fire to become established. Light the charcoal using a propane weed burner, a plumbers torch, a chimney, an electric coil, or starter cubes but DON’T use lighter fluid.
The charcoal in my Big Drum Smoker, or my Smokey Joe Custom Tall Boy is contained in a charcoal basket. I use a small torch with the Smokey Joe, and a weed burner to light the BDS. It's easy to add more charcoal to the Smokey Joe, and the BDS has a large enough basket to have a 10 to 12 hour burn time. With either of these cookers flavor wood can be mixed within the lump before lighting, and/or added during the cook.
Here is how I build a fire in my Big Green Egg. The process is more detailed because it's harder to add charcoal and wood to an Egg during a cook. I will use a handful or two of flavor wood chips, and 4 to 10 "splits", which are 3/4" X 3" pieces of flavor wood that I have split down from a fist sized chunk.
Step 1. Add a few large pieces of lump to the firebox. Large pieces are less likely to choke off the air flow. Sprinkle a few chips into the lump, add a little more lump, then add a few of the splits. I prefer a wagon wheel arrangement with the splits. Notice only the firebox is full, and I lit the lump in one central spot. This would be a good fire for ribs or sausage. And if I wanted a higher temp "grilling fire" I would light the lump in 3 spots.
Step 2. For a longer burning "barbecue fire" add another layer of lump, a few more chips, a couple of splits. Repeat this process until you have adequate lump for the length of burn you are doing. Then light the lump in one central spot. Here is a barbecue fire, this will be a long burning fire for ribs, butts or brisket. There is no need to add more charcoal or more flavor wood to this fire as it should cook for 16 or 18 hours in the 250° range.
Step 3. Once the fire is lit, I add a plate setter. I use a couple of inverted pieces of 1/2" angle iron to allow an air gap for my drip pan. The empty drip pan goes on the plate setter, followed by the cooking grate. I don't use any liquid in my drip pan. If you want to add liquid to the drip pan, heat it up first. There is no reason to waste energy from your charcoal for heating liquid. Now all you need to do is wait for the bad smoke to burn off, and you can start cookin'. (see the next section on SMOKE)
THE SMOKE
Guess what, you don’t always have to use smoke when you barbecue!!! However, it’s no secret that most folks do like a smokey flavor on their barbecue. Everyone has a different smoke threshold so you must be careful that you don’t over-smoke your product. If you’re using lump charcoal, it gives off a little smokey flavor on its own. Make sure to let the smoke from wood chunks or chips settle down before loading your cooker. Keep a watchful eye on your top vent or stack. A white smoke plume, billowing from your vent will most likely impart a bitter flavor and maybe a residue on your product. A light gray or blue smoke whiff is what you are after. This is one of the hardest things for a beginner to grasp so here are two pictures that “thillin” took of his Klose smoker with an offset firebox. In this type of cooker, the smoke moves from the firebox, across the cooking chamber and out the stack.
These pictures were taken just minutes apart and show the smoke in the final stages of settling down for a good long cook.
The next two pictures are of my Large Big Green Egg. On this cooker, the firebox is directly below the grate. Again the top picture is blowin' too much white smoke. The fire has not settled down yet.
About 30 minutes later, the smoke is just right. You can see just a whiff against the background of my neighbors roof.
Here is a picture taken by "Scotty's Inferno" showing a nice mellow smoke coming from his Big Green Egg. I think Scott described this sweet blue smoke perfectly saying "you almost wonder if it's even there".
You can tell by the number of pictures of top vents just how I feel about getting the smoke right. Here are two more in daylight. The dome temperature is 350°. In the top picture the smoke is trying to settle down, but it is not ready yet.
This picture was taken 15 minutes later. Now the smoke is ready to meet the meat.
Here is one more that really shows off the "sweet blue" color of good smoke.
Start experimenting with fruit woods like apple and cherry before using heavier woods like oak or hickory. Experiment with using your chips or chunks dry verses soaking them in water. Also try mixing small chunks or chips throughout the charcoal instead of using one or two large chunks. For a flavor twist, toss an onion into the coals.
An exception to this rule would be tossing a handful of chips into the red-hot coals just before grilling a steak or some burgers. When grilling, the vents are open more and the smoke will pass through your cooker faster.
SEASONINGS The goal is to compliment the flavor of the meat, without overpowering it. For starters, try out a few good quality commercial rubs or a mixture of your favorite seasonings sprinkled or rubbed into your product. Experiment to find the flavor combinations that you like.
There are many starter rub recipes on internet recipe sites, internet Q- forums or in the many barbecue cookbooks. Explore marinades, basting liquids and injections too. DON’T apply sauces too early during the cook, wait until the end or serve them at the table.
THE COOK
Start out with easy cooks. Use a thermometer to monitor the temperature at the grate as well as your product. Remote "polder type" cable thermometers work well because the probe can be clipped to the grate and you do not have to open the lid to monitor the temperature. An inexpensive oven thermometer sitting on the grate works too. When taking internal temperature readings on meat, make sure the thermometer is not close to bone or stuck into a pocket of fat, both of these locations will give you false readings. Bone is a good conductor of heat and will give you a false high reading. Pockets of fat don't conduct heat as well as the surrounding muscle (meat) so they will show a false low reading early in the cook.... later on, the fat temp and meat temp equalize.
Chicken, sausage links & logs, or country-style ribs (cut from a pork shoulder) are good starters. Whenever possible, cook meat on the bone. Spare ribs take a little more time and effort. A pork butt is a good choice for your first long “low and slow” cook. Turn or rotate your product the minimum number of times for even doneness, even color or if you have a hot spot in your cooker. Keep a close eye on your first few “all night” cooks. Too often the fire dies out in the early stages of the cook and goes unnoticed, resulting in food safety issues. Until you learn your cooker and how meat cooks, don't be too concerned with using "low and slow" pit temps around 200°. They can be hard to hold. Considering an average butt or brisket, a pit temp between 230° and 250° is usually adequate to insure an internal temperature of 140° or higher in the first 4 or 5 hours of your cook. Some cookers are more reliable than others but another good rule is to check your pit temp every 3or 4 hours, especially on overnight cooks.
Finding the right balance of pit temperature and time will make all of your grilled or barbecued meast tender and moist. Some meats have a higher fat content than others. A chicken breast for example is much leaner than a chicken thigh. Pork loin and tenderloin is much leaner than meat from the shoulder or rib areas. Fat does add flavor and helps keep meat moist, and generally speaking higher fat cuts have a broader window for doness than leaner cuts of meat. Going back to the chicken example, breasts are done when their internal temperature is between 160 and 165 degrees, much higher and they will be dry and tough. Chicken thighs on the other hand should be cooked into the high 170's or low 180's and they will still be moist and tender.
Meat is made of strands proteins and when you add heat (energy) to a protein you are breaking down it's structure. This relaxes the strands of protein making it more flexable and tender. However, if you add too much heat or too much heat too fast, the protein won't relax the way you had planned, and the meat can be tough. A good example is a steak.... they are pretty tender to start with so they can be cooked at higher temps for a short period of time. As a steak moves from raw to rare to medium rare it gets more tender as the protiens relax. As it passes through the medium, then medium well, then into well done range, the strands of protiens are tightening up, and moisture is getting squeezed out of the meat, so it gets tougher the more it's cooked. The same thing can happen to pork chops or white meat on chickens or turkey.
One thing you will notice when barbecuing heavier meats high in fat like brisket and pork shoulder is a stall in internal temperature during the cook. This "plateau" will happen around 160° to 170° and sometimes takes several hours. Then the internal temperature will begin to rise again. The plateau happens because moisture in the meat finds it's way to the surface and begins to evaporate. Above 170° collagen begins to melt and convert to gelatin. When this happens, we get a tender and moist piece of meat that is worth the wait. Wrapping your meat in foil (see below) prevents sweating and evaporation, so this can help getting through the stall.
TEMPERATURE GUIDE - The temperature ranges below have worked for me when considering moistness and tenderness of the finished product. The USDA has a different range of temperatures they recommend for food safety. Click on this link to learn more: USDA
Finding your personal sweet spot for doneness (target doneness) is what's important. To do this correctly, you must figure out the internal temperature to pull a particular piece of meat or fish off your cooker. Then allow for the rise (or carryover) in temp when resting.
A 5° to 7° rise can be expected in many grilled things like chops, burgers or steaks. Sometimes you might see a 10° rise. There are some exceptions..... A grilled salmon fillet may rise more than one that was hot smoked at a lower pit temp. A prime rib roast cooked at 350° may rise more than one cooked at 225°. A big roast like a pork butt, pulled at 200° may rise more than 10° because it has so much mass and a high fat content.
I tend to bend the temperature rules more often on poultry white meat, ground beef, lamb, steaks and pork loin. But you should decide your personal preference for doneness. I would however, suggest the USDA recommended temperatures when serving guests. Just remember that rise during the rest period. That being said, here are some guidelines that I use at home:
RIGHT CLICK THE PICTURE TO PRINT MY CHART
ELEVATION .....BOILING POINT
sea level ........ 212° F
600 ft ......... 211° F
1,100 ft ......... 210° F
1,600 ft ......... 209° F
2,100 ft ......... 208° F
2,600 ft ......... 207° F
3,100 ft ......... 206° F
3,600 ft ......... 205° F
4,100 ft ......... 204° F
4,700 ft ......... 203° F
5,300 ft ......... 202° F
6,000 ft ......... 201° F
6,500 ft ......... 200° F
7,000 ft ......... 199° F
7,500 ft ......... 198° F
8,000 ft ......... 197° F
8,500 ft ......... 196° F
9,000 ft ......... 195° F
FOIL
Sometimes called a crutch, foil does have a place in barbecuing. Using it when cooking meats is not mandatory so, just look at this way, foil is a tool not a rule. One of the downsides to foil is it will weaken the bark. (see The Rest below). A few times where it comes in handy are: 1. Your barbecued meats are coming out too smokey. 2. You need some control in the color of your finished product (the bark). 3. You need to speed up the cook in order to meet your sit down time. 4. You want to change the texture of your product. Wrapping ribs with some liquid in the foil for example will steam/braise them making them more tender. Some folks sauce and foil thighs (usually a foil covered pan) at the end of the cook too. Following the cook, wrapping and resting meats in foil, especially if you are holding them in a cooler or Cambro-type device works great. Lastly wrapping (see above) can help shorten the stall.
THE REST
Allow your meat to rest before slicing or pulling. The juices need time to re-distribute into the meat. A prewarmed cooler is a good place for resting or holding your product until serving. Wrap in foil and use some newspaper for extra insulation if you need to hold it for a couple of hours. If you are worried about the condition of the bark, and not interested in the juices that accumulate in a foil pouch, or if you are slicing to order but still want to keep the meat moist... a brown paper bag works good too. Put the meat on a metal tray (or a piece of foil) and slip into the bag.
SERVING
Ok, now you are ready to dig in. If you are slicing beef, pay attention to the grain and cut across it for tenderness. The slice of brisket on the left is cut with the grain, and the slice on the right is cut across the grain.
When pulling or chopping beef and pork, remove some of the fat but be sure and mix some of the crust or “bark” in with the meat. If you have finished or rested your meat in foil, save the juices and use them to enhance the meat or as an adder to your sauce.
Don’t be alarmed if grilled and barbecued meats, especially chicken, has a pink color. This is a natural reaction from the smoke and does not mean that the meat is under cooked. If you monitored your finish temperature and any cutting board juices run clear, the meat is done. (Underdone chicken will not pull apart easily A simple trick is to blot a paper napkin onto the chicken or the juices, if it comes away pink, the chicken is underdone). This is a boneless thigh which was cooked to an internal temperature of 185°.
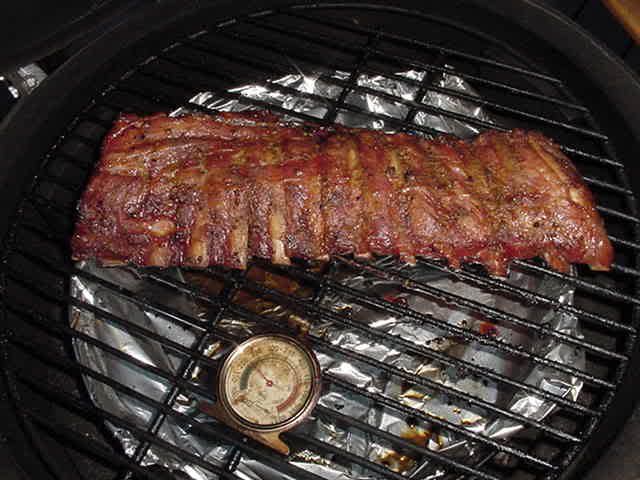
These baby backs were barbecued for almost 5 hours at 225° using a little cherry wood for smoke. Trust me....they are done.
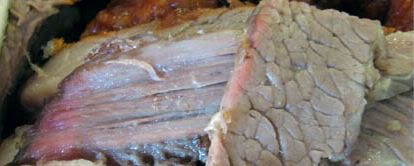
You will sometimes notice a red or pink ring around the edge of slices on larger cuts of meat like this brisket. This ring is highly desirable in barbecue competitions, but it adds no special flavor.
Don't be too eager to slather on the sauce, it is not always necessary. I like to serve a couple of kinds at the table.
REHEATING
For reheating barbecue use an aluminum pan. Add a diluted sauce, CocaCola, apple juice, broth or a mixture of any of these to keep the product moist, cover and place in a 250° oven for about an hour or until warm.
I have the results of a survey of favorite reheating liquids posted in the Rubs, Sauces, Mop section, check it out if you are looking for something new.
FOOD SAFETY
The nature of any outdoor cooking event, from grilling some burgers to smoking a brisket for 20 hours, sometimes allows us to let out guard down when it comes to food safety. And I don't just mean once we are in the backyard. I'm talking transporting and preparing raw meats, cooking, and serving.
HERE
is a link to the USDA site that discusses barbecue safety issues. It's worth a read.
![]()